My oxygen fired ABS-pipe cannon
After having seen Ron Harding's potato cannon, I just had to take the sport to its full level of insanity!These photos are from some "tests" we performed on a precursor to the RIM Blackberry in August 1998.
My cannon I designed to be fired with an oxygen-propane mixture, although other gasses work just as well. One of the major design criteria was to have a fueling system where I could see how much fuel I put in the cannon. Another goal was that I didn't need to put my hands near the fueled up cannon. The possibility of the mixture auto-igniting at an unexpected moment, or the cannon simply exploding were a serious consideration.
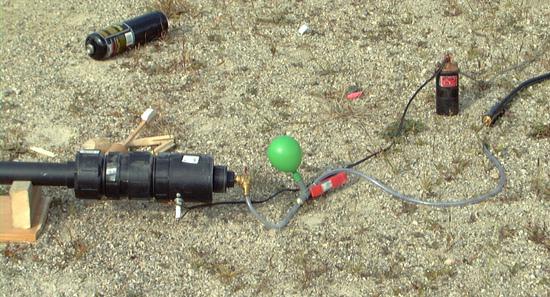
 What I came up with was my balloon fuel metering system. Basically, the balloon
on a T-connector. One side of the T goes to a hose connected to the fueling
valve on the cannon, while the other end is pushed onto the end of a welding
torch.
What I came up with was my balloon fuel metering system. Basically, the balloon
on a T-connector. One side of the T goes to a hose connected to the fueling
valve on the cannon, while the other end is pushed onto the end of a welding
torch.
I begin by connecting everything up, with the fueling valve on the cannon in a closed position. Next I fuel the balloon to about a 6 cm diameter with propane. Then I fill it with oxygen to twice that diameter. I do all this from a distance as large as the length of the hose will allow. Fueling the propane first makes a lot of sense, as it takes much less of it, and by adding the oxygen afterwards, I can be confident the propane gets mixed with the oxygen and gets into the cannon.
 Priming the cannon - from a distance
The next step involves transferring the fuel from the balloon into the cannon.
This is accomplished by opening the valve at the end of the cannon. I have a slot
cut into the end of my ram rod, which allows me to turn the valve from
a safe distance. It's generally best to let the fuel into the cannon very
slowly, so that the pressure of the gas does not push the projectile forward
in the cannon barrel. The cannon also has a bit of a 'baffle' near the fueling
valve to make sure the fuel does not 'shoot' through the chamber, but slowly
creeps through it, hopefully displacing the air.
The ignition system took a few tries to get right. My first system consisted of two screws screwed into the side of the ABS pipe, connected to a BBQ lighter. This system typically worked for the first shot. After that, there was too much condensation in the cannon, which shorted out between the screws. So next I installed a spark plug, which is much better at maintaining insulation once you get some humidity in the canon. Still the wimpy BBQ lighter wasn't enough. So I switched to using an ignition coil. This also has the advantage that the ignition coil can be placed near the cannon, and the low voltage wires connected to the primary side can be run for quite a distance without having to worry about the wires arcing somewhere.
 Some of my projectiles - much better than potatoes!
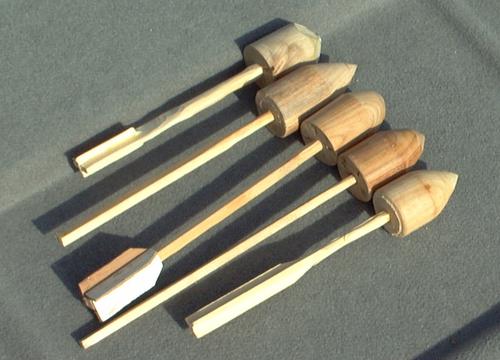
I also came up with fancier projectiles.
The problem with shooting potato slugs is that they are often softer than
the target, so the potato disintegrates into a mist without penetrating
the target. I decided to make some nice aerodynamic projectiles
out of hardwood. Initial experiments indicated
that the projectiles quickly started tumbling in the air once they left the
cannon, which is bad for both aerodynamics and accuracy.
I then made projectiles that were just short cylinders, seeing that
there was no point in making one end pointed.
Later on, I started putting a tail on the projectile, which makes it aerodynamically stable so that the projectile continues to point forward. When loaded in the cannon, the head is in the barrel, while the tail reaches into the combustion chamber. The above photo shows some of my projectiles - before I shot them. The elaborate tail on the middle projectile turned out to be a complete waste of time. With the acceleration in the cannon probably at about 2000 times the force of gravity, the tail fins were still in the cannon's chamber after the shot. The tail on the bottom right projectile also did not work very well. It wasn't made of hardwood and just ripped apart when I shot it. A straight hardwood tail works the best.
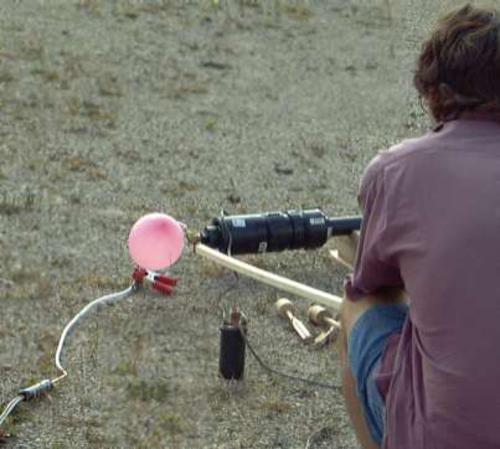
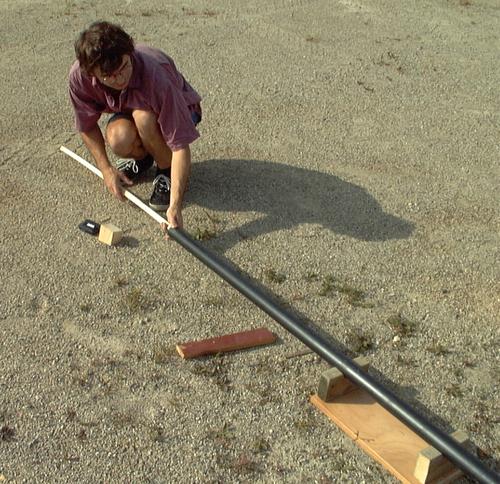 Loading the cannon with a ramrod (prior to fueling!)
Here's me loading the cannon with the ramrod. The ramrod isn't
really necessary when shooting just a hardwood projectile - I always make
these so there is about a quarter millimeter of space so they slide in and
out freely. When putting wadding behind a projectile, or shooting potato slugs,
the ramrod comes in really handy.
Note that the projectile is loaded before the cannon is fueled.
I did some measurements of the speed of the projectiles after leaving the muzzle of the cannon, by shooting through two pieces of wire half a meter apart and measuring the time interval between when the electrical circuits were interrupted. My good measurements all come out to about 175 to 180 meters per second, or just over half the speed of sound.
With the projectiles travelling that fast, there is no point in shooting into the air and watching how far it will go -- it moves too fast to be seen. Shooting at a particular target at close range is much more fun.
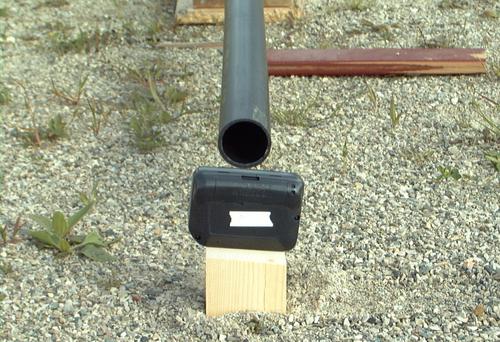
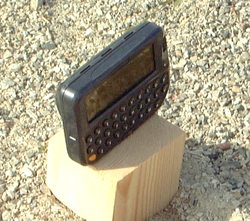 Small and helpless pieces of electronics, like this Inter@ctive pager 950
(before it was called a Blackberry) are ideal targets - there's just so many
pieces to become dislodged on impact. Numerous pagers, as well as an answering
machine have met a bitter, but entertaining, end this way. The above shot is
of another pager getting shot. I think in this shot, it wasn't a total direct
hit, and the projectile got deflected under the piece of carpet, which pushed
it up.
Small and helpless pieces of electronics, like this Inter@ctive pager 950
(before it was called a Blackberry) are ideal targets - there's just so many
pieces to become dislodged on impact. Numerous pagers, as well as an answering
machine have met a bitter, but entertaining, end this way. The above shot is
of another pager getting shot. I think in this shot, it wasn't a total direct
hit, and the projectile got deflected under the piece of carpet, which pushed
it up.
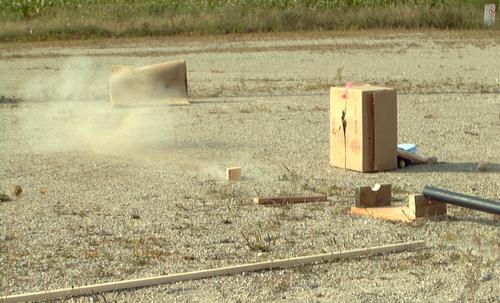 This shot was taken a fraction of a second after the shot.
The pager is gone, and the cannon has recoiled mostly out of the picture.!
This shot was taken a fraction of a second after the shot.
The pager is gone, and the cannon has recoiled mostly out of the picture.!
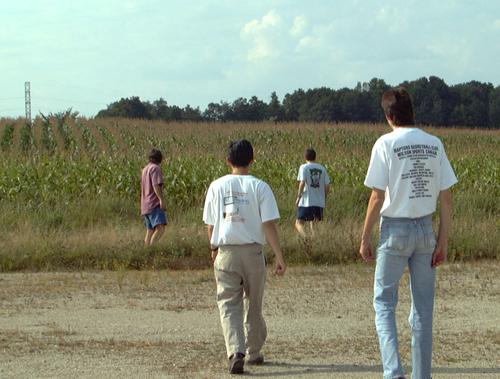 It appears we lost some of our test results in the corn field!
In this photo, from left to right: Me, Bao Nguyen, Wilie Garvin, Perry Jarmuzewski. None are still at RIM, but all left voluntarily.
 The carpet wasn't that effective at stopping
anything either. It ended up with numerous holes from projectiles going
through. On cleaning up, we found a small 1.5" circular shred of carpet - the
same diameter as the projectiles - lying around, This, no doubt, was punched
out by one of the shots.
The carpet wasn't that effective at stopping
anything either. It ended up with numerous holes from projectiles going
through. On cleaning up, we found a small 1.5" circular shred of carpet - the
same diameter as the projectiles - lying around, This, no doubt, was punched
out by one of the shots.
 Smashed bits of pager. The Inter@ctive pager 950 actually stood up much better
than when we tested the tested the previous model
Smashed bits of pager. The Inter@ctive pager 950 actually stood up much better
than when we tested the tested the previous model
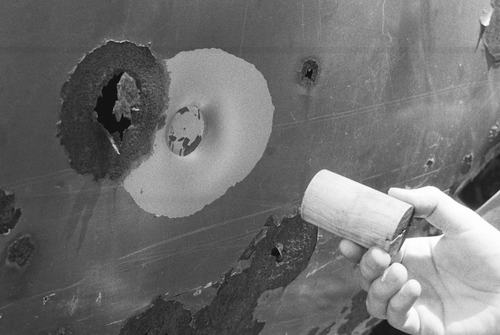
 Bullet hole in 3/4" plywood
I also tested the cannon against some 3/4" plywood. When I shot a hardwood
projectile against it, it went straight through, and fairly cleanly. By
the shape of the hole, I could tell that by the time it hit the plywood, the
projectile was travelling sideways, and pointing down to the left. This was before
I started making projectiles with tails.
A potato shot at the same piece of plywood mostly became absorbed within the plys of the wood, although the back of the wood bulged. Part of the potato sprayed through the cracks out the other side.
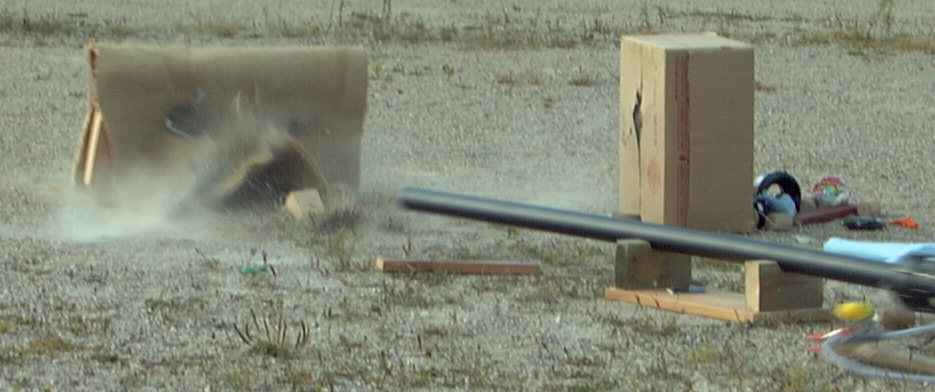
 Result of shooting against the side of an old vehicle
Shooting against the side of an old pickup truck produced less spectacular results.
The sheet metal, because it is able to yield, is capable of absorbing a lot of energy
before it tears. Its interesting though how much paint got peeled cleanly off the sheet
metal from the impact. The indentation was about 2 cm deep from the original surface, and
extended to the edge of the peeled paint. Of course, as the picture shows, the cannon
did less damage to the metal than a spot of rust did in 20 years.
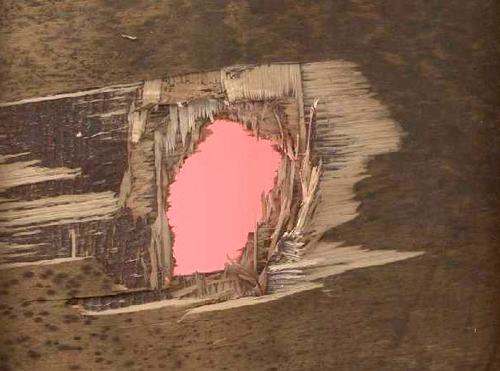
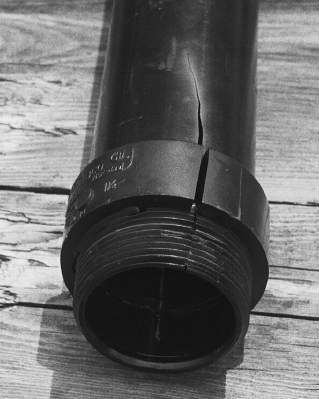 A failure in the cannon barrel
Its interesting that the ABS pipe is able to withstand the abuse of being used as a cannon
at all. Before firing the cannon for the first time, I took numerous precautions to shield
myself from the grenade like explosion of shrapnel that might result. Through the course
of numerous 'tests' I became more and more confident that the ABS would in fact hold up.
Nevertheless, after maybe 30 firings, my cannon experienced a failure.
My original design had a barrel that was attached to the main chamber using an
ABS screw thread adapter, shown above. This was a weak link, but I figured that
the chamber, with its larger diameter would fail from pressure
before this link would.
I think what eventually happened is that from the recoil, the chamber always
got bounced around, and eventually snapped the thread off.
What is more surprising is that the 1.5" barrel actually developed a longitudinal crack. The
barrel should experience significantly less stress on the ABS than the chamber. At any
rate, the picture above shows the failure of the barrel at the breech end.
The comforting thing about this failure is that it did not result in any shrapnel. Fact is, The first thing I noticed that was wrong was that the projectile, when it hit the target, did no damage whatsoever. My brother had videotaped that shot, and you could actually see the projectile coming - it was that slow! Most of the gasses had escaped though the crack, which no doubt opened wide when the cannon was fired. I had done some tests on pieces of ABS before building the cannon to see how much it would deform before breaking, and expected to have few flying pieces in a failure. It was nice to see this confirmed. I understand that PVC (the white stuff) does not have nearly as nice a failure characteristic.
I later bought a new piece of ABS pipe for a barrel, and this time bonded it directly into a new 3" to 1.5" adapter, eliminating this weak spot. I haven't had any mechanical failures in that cannon since.