Igloo building experiments

|
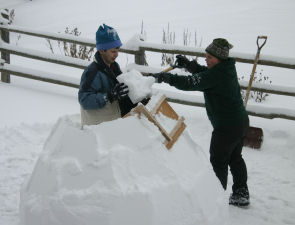
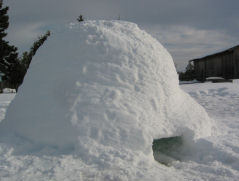
| The "Ice Box" igloo making tool in action |
This works even if the snow isn't really sticky. The form has a mechanism for loosening it, so that it can be removed from the just formed block of snow without destroying it. Given a bit of time, the packed snow becomes more solid, and by the time the next row of blocks is built on the igloo, the previous row is firm enough to support it. With a little bit of initial pressure, and a bit of time, the snow crystals apparently 'lock' together. This is the same process that makes the snow that has been piled up in a snowbank fairly hard over time.
I thought this was a neat idea. But the catch is, this 'igloo kit' costs over $200 Canadian, and it doesn't even include the raw material for the igloo!
So, I set out to do some experimentation of my own.
Garbage can as an igloo tool
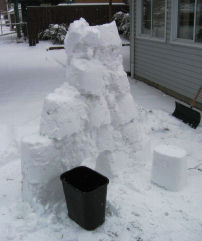 My first experiment was to use a rectangular garbage can to see if that would work as
an igloo making tool. The idea being to make blocks with the garbage can, and then
stack them.
My first experiment was to use a rectangular garbage can to see if that would work as
an igloo making tool. The idea being to make blocks with the garbage can, and then
stack them.
I had powdered snow when I tried this. Even though the snow wasn't sticky on its own, I was able to make blocks with the garbage can. This by filling it with snow, pushing it into the can, then inverting it and slamming it down on my driveway. This loosened the snow from the can enough that I could lift the can and have the block left over. The resulting blocks were initially very soft and could not be picked up. But if I left the blocks sit for a few minutes after I took them out of the can, they became firm enough that I could pick them up and stack them into a wall. Getting them to connect well was a bit tricky though. But it may well be possible to build an igloo from powdered snow using just a garbage can, as long as one always makes something like 20 blocks in advance, so they have time to become more solid before stacking.
The process could also be improved by cutting a large hole in the bottom of the garbage can so that the blocks can be pushed out of the can without banging, which would eliminate the need for a hard surface to bang the can against, and avoid damage to the blocks from banging them out of the can. Certainly, the can is cheap enough, and easy to obtain too. It helps if the container you are using is tapered.
Home made igloo making tool construction
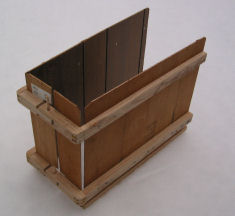 After my experiments with the garbage can, I started building my own igloo making tool.
From the garbage can experiments, I knew it would be good to be able to open up the form
around the block, because pulling it off upwards or sideways would do some damage to the block.
After my experiments with the garbage can, I started building my own igloo making tool.
From the garbage can experiments, I knew it would be good to be able to open up the form
around the block, because pulling it off upwards or sideways would do some damage to the block.
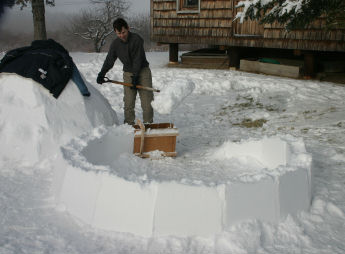
The design I went for was roughly a C shaped form, which hinged open so that it could be opened up around the just formed block. To hold the form while being filled with snow, I made another C shaped bracket. This bracket is placed over the form from the top, and keeps the sides from opening up while it's filled with snow. The two arms of the C actually spread a bit towards the end, so that it can easily be pulled off the form. The form in turn uses wider pieces of wood on the bottom to compensate. I was also expecting the form to be under more pressure towards the bottom while it was being packed with snow. I varnished the whole thing with an oil based varnish. Oil based varnish is a bit hydrophobic, so I figured it would release the snow better than water based varnish, and ceretainly better than bare wood.
The form is for walls about 20 cm thick. Its 45 cm wide and 35 cm high.

Testing the igloo making tool: First Igloo
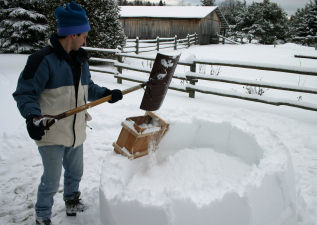
My first igloo experiment was a relatively small igloo. Fact is, it wasn't even a round igloo, because I decided to make it a bit smaller after I started the first row of blocks. As it was, the first test igloo was only big enough to crouch inside. But I was pretty happy with the result. The form worked pretty good.
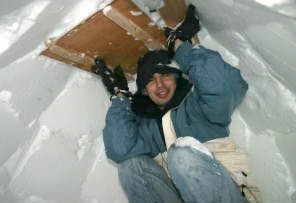 To close the igloo at the top all the way, the form wasn't usable as a form. Instead,
I just held it to the top of the igloo, while my sister shoveled show on top and patted it down.
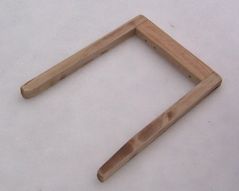
At the time, I had the two halves of the igloo form held together with a pair of bolts as
hinges. I realized being able to hold both halves up to the top of the igloo separately
would be better, and subsequently replaced the bolts with wooden pegs that could be
pulled out without tools.
To close the igloo at the top all the way, the form wasn't usable as a form. Instead,
I just held it to the top of the igloo, while my sister shoveled show on top and patted it down.
At the time, I had the two halves of the igloo form held together with a pair of bolts as
hinges. I realized being able to hold both halves up to the top of the igloo separately
would be better, and subsequently replaced the bolts with wooden pegs that could be
pulled out without tools.
This igloo held up fairly nicely, although I noticed the next day that it had started to
bulge out to the sides a bit. The mistake I had made was to start the first row of blocks
vertically, instead of slanted inwards a bit. Due to the dome pushing downwards and outwards,
the first row started to tip outwards slightly. The next couple of days were fairly warm,
with a bit of rain. Still, the igloo did not collapse suddenly. Instead, it just sagged all the way
to the ground over the next couple of days. Having the igloo fail through sagging I think is
more desirable than a sudden collapse if one were to use an igloo as a shelter for the night.
Second Igloo
All this igloo building activities happened during the Christmas holidays. My sister had brought home her 'Ice Box' igloo making kit to show it off. But the problem was, I built an igloo with my home made tool before she got around to building one. So the next day, she set out to build a 'real' igloo, with her fancy expensive tool.
 This didn't go all that smoothly. After opening up the kit, she realized she didn't remember
how to assemble the complicated guide pole assembly, and had to download the manual for
her tool from the internet.
This didn't go all that smoothly. After opening up the kit, she realized she didn't remember
how to assemble the complicated guide pole assembly, and had to download the manual for
her tool from the internet.
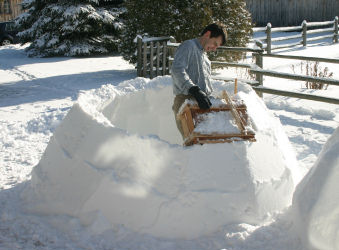
She eventually did get going, but using the ice box igloo maker is a very time consuming matter. I remarked how her tool would be quite hard to use in the wilderness without internet access to look up the instructions. At which point she snapped back that it wasn't even possible to build anything bigger than the miniature igloo I had built with my tool! Them's fighting words! So I set out to build a bigger igloo with my igloo making tool.
 This time, I started the first row of blocks with a fair bit of an inward slant. I continued
with the initial inward slant. Having started at a certain slant, I was obliged to keep
curving inwards. This is where the complicated guide pole assembly of the "Ice box" igloo
kit can be useful - you follow the guide pole, and you get some predetermined shape. The guide
pole is especially important for people who have no ability to eyeball shapes accurately,
which is pretty much most people.
This time, I started the first row of blocks with a fair bit of an inward slant. I continued
with the initial inward slant. Having started at a certain slant, I was obliged to keep
curving inwards. This is where the complicated guide pole assembly of the "Ice box" igloo
kit can be useful - you follow the guide pole, and you get some predetermined shape. The guide
pole is especially important for people who have no ability to eyeball shapes accurately,
which is pretty much most people.
As it was, my second igloo didn't end up much taller than the first, but it covered a bigger ground area. Work progressed fairly quickly, and my sister Marlene started helping me. Even though I started the second igloo after Johanna started hers, we finished this one a fair bit before Johanna, with Markus' help, finished her igloo. The complicated guide pole assembly does consume a bit of time.
Not surprisingly, Johanna developed a bit of animosity towards my tool, referring to it as a "CheatBox" in her writeup about her igloo building experience. Not sure how building your own tool is cheating, where buying one is not. Hmm... interesting thought there.
Igloo performance under melting conditions (sagging)
Even as we were building our respective igloos, the weather started warming up. The next day was fairly warm, and the day after that was rainy.
 ... 24 hours later...
Johanna's igloo ended up being mostly conical for much of its height, with a dome shaped top. While this was stable enough when it was cold, under melting conditions, the sagging of this shape resulted in a buckling condition, which proved to be the igloo's undoing. Although it didn't fall down, it did gradually fold in on itself in the most interesting manner. This may not matter all that much - it doesn't make that much sense to camp out in an igloo when the weather is above freezing, except maybe as a shelter from the rain. And even that is a questionable use of an igloo.
My first mini igloo fared worse. The walls kept sagging outwards, and the top kept coming down. It just kept getting lower and lower.
My second igloo on the other hand did fairly well. Like the other igloos, it sagged, but it managed to maintain its shape fairly well for most of the sag, so I guess the curvature I used was fairly suitable.
All in all it was nice to see that none of the igloos we built collapsed spontaneously. this should give some peace of mind in terms of trying to use one for camping. Not that I am the winter camping sort of person, but good to know nonetheless.
Third Igloo
 After building the first two igloos, the weather was warm for a while. About a week
later, it turned cold again, and we had some snowfall again, but not very much, not
enough to build an igloo with. But at my parents cottage, 20 km north and on a lake, there
was more snow. We built it on the lake, so that snow could more easily be pushed
together with a snow shovel.
After building the first two igloos, the weather was warm for a while. About a week
later, it turned cold again, and we had some snowfall again, but not very much, not
enough to build an igloo with. But at my parents cottage, 20 km north and on a lake, there
was more snow. We built it on the lake, so that snow could more easily be pushed
together with a snow shovel.
The temperature was much colder, so the snow took longer to set. A couple of times, in the process of removing the form, I crumbled the block I had just packed. However, the previous row of blocks always held firm when I got all the way around to build on them.
As the walls started to curve inwards increasingly, however, things got more challenging. The block needed a fair bit of firmness just to hold against gravity. Having some sort of a guide pole to support the form would have been helpful, but then the block still needs to be firm enough when the form is moved, so that wouldn't really solve the problem. Just letting the block set longer tended to help. Using fresh snow was slightly better, but by the time we got that far to the top, we had scraped up all the snow that could be scraped up within a 10 meter radius of the igloo!
We took a coffee break at some point. Before going to the break, I took the snow from blocks that had crumbled, and made some blocks with it just on the ground, and with a bucket. After the break, which lasted at least half an hour, these blocks had become quite firm, and could be attached to the top of the igloo. By placing the blocks such that their sides pressed against each other, they were prevented from falling into the igloo. I then packed loose snow into any crevices. That worked really well, until I ran out of the blocks I had built before the break. We then made some more blocks in the same way, but they didn't get solid fast enough. By that time, it was approaching dusk, so we didn't want to stick around waiting for them to set. We left the igloo unfinished to head back home. If the igloo was meant for sleeping in, we would of course have waited. We made some more blocks, in case we'd go back and finish it the next day, but then the weather got warmer again. When its around freezing, the snow sticks quite sell, and finishing it would have been easy and not proven anything.
But it was an interesting lesson - it could be that a simple bucket to make blocks with, and then stack them is superior to both my tool and the IceBox contraption, at least when the snow doesn't stick very well. Of course, with the ice box, you could let each block set for 5 minutes before proceeding, but that would take forever. Interestingly enough, it can take a whole day to build an igooo with the IceBox tool if you don't have the right kind of snow.
Also interesting was that the blocks made with a small round bucket worked surprisingly well. The round bucket holds its shape better than a rectangular bucket. On placing them, I just carved out a semi circular cutout on one side, so that the next block could fit into it. And the added advantage with making blocks using buckets is that lots of people can make blocks, which could really speed up igloo construction when there are more people. I did some more experiments on that front.
Other winter related articles on this website:
To my Home page