More about my home made table saw box joint jig
Having used my box jointing jig, I have learned a few extra tricks and things to watch out for.One problem is that if a grove needs to be cut on the inside of the box, it will cut away part of one of the fingers, leaving a gap visible from outside the box. This subsequently has to be filled in with another piece of wood when the box is glued.
On a recent project, I experimented with a way around this. I made the inside-most part of my joint a miter joint, while the outside part is a box joint. This allowed me to cut a groove on the inside, without cutting a way a piece of one of the fingers. This would also avoid the ugly corner if the inside edges were beveled, for example.
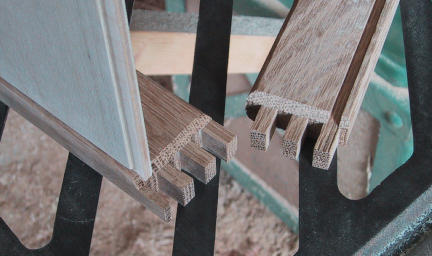
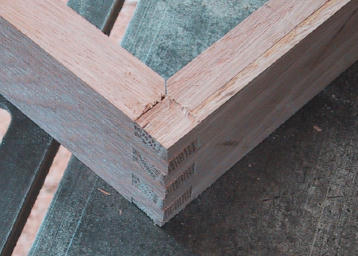
It turms out cutting this sort of joint precisely is very difficult and time consuming. If the 45 degree part does not exactly meet up with the corners of the joint, it will not close poperly. A 0.2 mm error will already leave the joint open by 0.4 mm, way too much for it to look good. And getting the 45 degree cuts measured and aligned to 0.1mm accuracy is way too hard.
The other problem I have encoutnered is when cutting a number of pieces all at once in
hardwood.
The saw blades can start to vibrate, and produce a cut that is effectively wider than what
was set up, and uneven. The resulting joint goes together just fine, but has visible gaps. These
I have to subsequently fill with pieces of wood shaved off and carefully inserted into the gaps.
The probmem is worst with dull blades, small shims, multiple pieces of hardwood, and fast cuts.
Its less likely to happen when cutting just one piece to test the adjustment. The worst is
when I cut my trial pieces too fast (causing a wider cut), and I adjust for that. Then I
cut the actual pieces slowly (narrower cut). The resulting joint takes a big hammer to
assemble! Especially when the glue has already sarted to set, which it does very quickly
on tight joints.
Another thing I have found is that for pieces less than 5 cm wide, just resting them on end on my sliding table before clamping them does not guarantee them to be at a right angle, as the wood is a bit uneven there. I sometimes use a square to line them up. More effectively though is to screw a piece of wood onto the end of the pice that slides sideways from the screw, forming a vertical stop to align the pices with. It also makes repeating the same slot alignment much easier. This really helps ensuring that your joings will line up. To cut the mating part, just use the same stop, but offset by half the number of turns on the screw that you use between cuts of the slots.
Back to Matthias Wandel's home page